Image Seam Carving with seam_carve
This section demonstrates how to use the seam_carve function to implement content-aware image reduction. The seam_carve function resizes an image to target dimensions by removing low-energy seams (paths of least importance).
This guide will demonstrate the usage and functionality of the seam_carve function through a series of practical examples.
Importing Necessary Libraries
First, we will need to import the necessary libraries and load a grayscale and color (RGB) image to manipulate. We will use matplotlib to display images and numpy for array manipulations.
Note: To maintain a clean demonstration, we’ll suppress any
UserWarningthat may appear in the tutorial.
import numpy as np
import warnings
import matplotlib.pyplot as plt
from skimage import data
from sharpedge import seam_carve

# Suppress warnings to ensure cleaner output
warnings.filterwarnings("ignore")
Preparing Your Image
We’ll define the sample images from scikit-image library. The image used is the rocket image.
Example: RGB Rocket Image
# Load the rocket color image from scikit-image
img = data.rocket()

# Display the image
plt.imshow(img)
plt.title("Rocket Color Image")
plt.axis('off')
plt.show()

# Display shape and exact numpy array
print(f'Rocket color image in 3D: {np.shape(img)}')
print(f"First 3 rows and 3 columns (RGB values) of the rocket color image:\n{img[:3, :3]}")
Rocket color image in 3D: (427, 640, 3)
First 3 rows and 3 columns (RGB values) of the rocket color image:
[[[17 33 58]
  [17 33 58]
  [17 33 59]]

 [[17 33 58]
  [17 33 58]
  [17 33 59]]

 [[18 34 59]
  [18 34 59]
  [18 34 60]]]
Applying the seam_carve function
We can now apply the seam_carve function to resize our image to a smaller dimensions. You can customize the desired height and width of the target image by assigning the target_height and target_width.
Note: Both
target_heightandtarget_widthshould be no greater than the height and width of the original image.If you’re unsure about the original dimensions, you can check them using
np.shape(YOUR_IMAGE)[:2]or run the code below:
# Get the original dimensions of the image
original_height, original_width = img.shape[:2]

print(f"Original Dimensions: {original_height} x {original_width} (Height x Width)")
Original Dimensions: 427 x 640 (Height x Width)
Reduce the Height of the Image
Let’s reduce only the height of the image by setting target_height to 350 while keeping the target_width unchanged at its original value of 640.
Note: You should encounter a UserWarning stating, “Target width is the same as the original width”. This is expected and indicates that no width adjustment will be made during the process. In our tutorial, however, the warning is suppressed to improve clarity in the demonstration.
import warnings
warnings.filterwarnings('ignore')

# Apply seam carving to reduce the image.
# Target dimensions:
# - Height: 350 pixels.
# - Width: 640 pixels (same as original width, no change).
reduced_height_img = seam_carve(
    img=img,
    target_height=350,
    target_width=640
)

# Display the reduced image
plt.imshow(reduced_height_img)
plt.title('Reduced Height Image (350 x 640)')
plt.axis('off')
plt.show()

# Check the dimensions of the original and resized images
print(f'Original Dimensions: {img.shape[:2]} (Height x Width)')
print(f'Resized Dimensions: {reduced_height_img.shape[:2]} (Height x Width)')
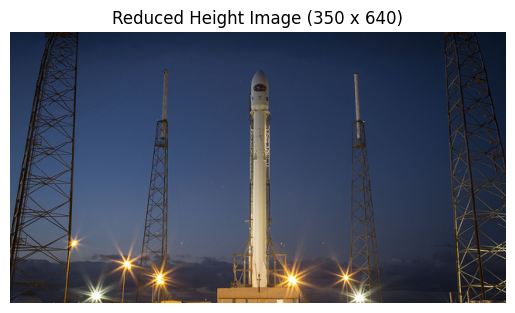
Original Dimensions: (427, 640) (Height x Width)
Resized Dimensions: (350, 640) (Height x Width)
Reduce the Width of the Image
Let’s try recuding the width only this time by setting target_width to 500 while keeping the target_height unchanged at its original value of 427.
Note: Similarly, you should receive a UserWarning stating, “Target width is the same as the original width”. This is expected and indicates that no width adjustment will be made during the process. In our tutorial, however, the warning is suppressed to improve clarity in the demonstration.
# Apply seam carving to reduce the image.
# Target dimensions:
# - Height: 427 pixels (same as original width, no change).
# - Width: 500 pixels.
reduced_width_img = seam_carve(img=img, target_height=427, target_width=500)

# Display the reduced image
plt.imshow(reduced_width_img)
plt.title('Reduced Width Image (427 x 500)')
plt.axis('off')
plt.show()

# Check the dimensions of the original and resized images
print(f'Original Dimensions: {img.shape[:2]} (Height x Width)')
print(f'Resized Dimensions: {reduced_width_img.shape[:2]} (Height x Width)')

Original Dimensions: (427, 640) (Height x Width)
Resized Dimensions: (427, 500) (Height x Width)
Resize Both the Height and Width of the Image
In this example, we will resize both the height and the width of the image, both target_height and target_width setting to 400.
Note: Resizing both dimensions may take longer than resizing only one due to the additional computation required. Grab a coffee while you wait!
# Apply seam carving to resize the image.
# Target dimensions:
# - Height: 400 pixels.
# - Width: 400 pixels.
fully_reduced_img = seam_carve(img=img, target_height=400, target_width=400)

# Display the resized image
plt.imshow(fully_reduced_img)
plt.title('Fully Reduced Image (400 x 400)')
plt.axis('off')
plt.show()

# Check the dimensions of the original and resized images
print(f'Original Dimensions: {img.shape[:2]} (Height x Width)')
print(f'Resized Dimensions: {fully_reduced_img.shape[:2]} (Height x Width)')
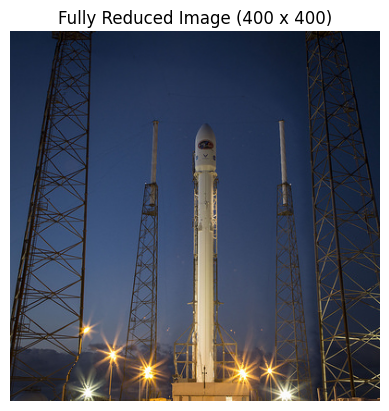
Original Dimensions: (427, 640) (Height x Width)
Resized Dimensions: (400, 400) (Height x Width)
Congratulations! You have successfully learnt how to use the seam_carve function to reduce images in a content-aware manner. Feel free to try your own images to explore the potential of seam carving!